FREE Pillow Crochet Pattern
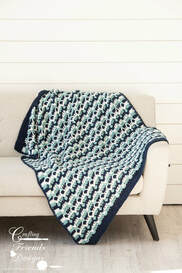
Sometimes, just a splash of pattern is all you need. The Sea Breeze Rectangle pillow crochet pattern is the perfect example of that! This pillow is worked from the bottom up with a fun patterned flap that folds over the top. It's easy to remove for washing or swapping out for different colors throughout the year.
This crochet pattern is available to view for FREE here on my blog by continuing on below or you can purchase the ad free pdf instant download HERE. The pdf includes instructions to make your own pillow form too. 
***This post contains affiliate links through which I may receive a small commission for purchases at no extra cost to you***
I don't know about you, but the color of seafoam is so relaxing to me. It brings to mind a beautiful summer day on a sunny beach with waves foaming on the sand. The smell of the fresh water and sound of waves and birds chirping....Ahhhh
Enjoy the refreshing summer breeze in your home with the beautiful Sea Breeze Home Decor crochet pattern collection. Sea Breeze 12" x 16" Retangle Pillow Cover
© 2018 Copyright by Kate Wagstaff of Crafting Friends Designs
© 2018 Photo Copyright Ash & Co It is Illegal to copy, share or upload this pattern to sites for others to access This pattern is not to be used for educational purposes You do have permission to sell finished items you crochet using my patterns You are in no way to alter the pattern and claim it as your own to sell or give to others Email: [email protected] Facebook: https://www.facebook.com/CraftingFriendsDesigns Etsy: www.etsy.com/shop/CraftingFriendsDesig Ravelry: http://www.ravelry.com/designers/kate-wagstaff
Skill Level: Easy
Terms: US crochet terminology Materials: Bernat Satin 4ww yarn or similar Snow - 42 yards, Sage - 42 yards, Admiral - 360 yards Yarn Needle, Stitch marker, 1 Button (1”) Needle and matching thread (Admiral) Hook Size: I/9-5.50mm & K/10 ½ -6.5 mm Gauge: 13 dc & 7 rows = 4 inches Finished Size: 12” x 16” Stitches: ch - chain, st(s) - stitch(es), sl st - slip stitch, sc - single crochet, dc - double crochet Special Stitches Shell - (2 dc, sl st around ch-5, 2 dc) in indicated stitch Herringbone hdc - yarn over, insert hook in indicated st, yarn over, pull through stitch and first loop on hook, yarn over, pull through remaining 2 loops on hook Foundation hdc - If you are unfamiliar with this foundation chain, view this photo tutorial on my blog Photo tutorial: http://craftingfriendsdesigns.blogspot.com/2014/12/hdc-chainless-foundation.html Video tutorial: https://www.craftingfriendsdesigns.com/bloggingfun/hdc-foundation-chain-video-tutorial Notes:
With Admiral
Round 1: Foundation hdc of 92, make sure your foundation chain is not twisted, sl st to beginning hdc to connect Note: This will be about 27” in diameter at rest but stretches nicely to fit the 12” x 16” pillow Rounds 2-42: Turn, Herringbone hdc in each st around, sl st to beginning Herringbone hdc to connect (92 Herringbone hdc) Do not fasten off Admiral, place a stitch marker in the loop and drop to inside of pillow cover
With Snow
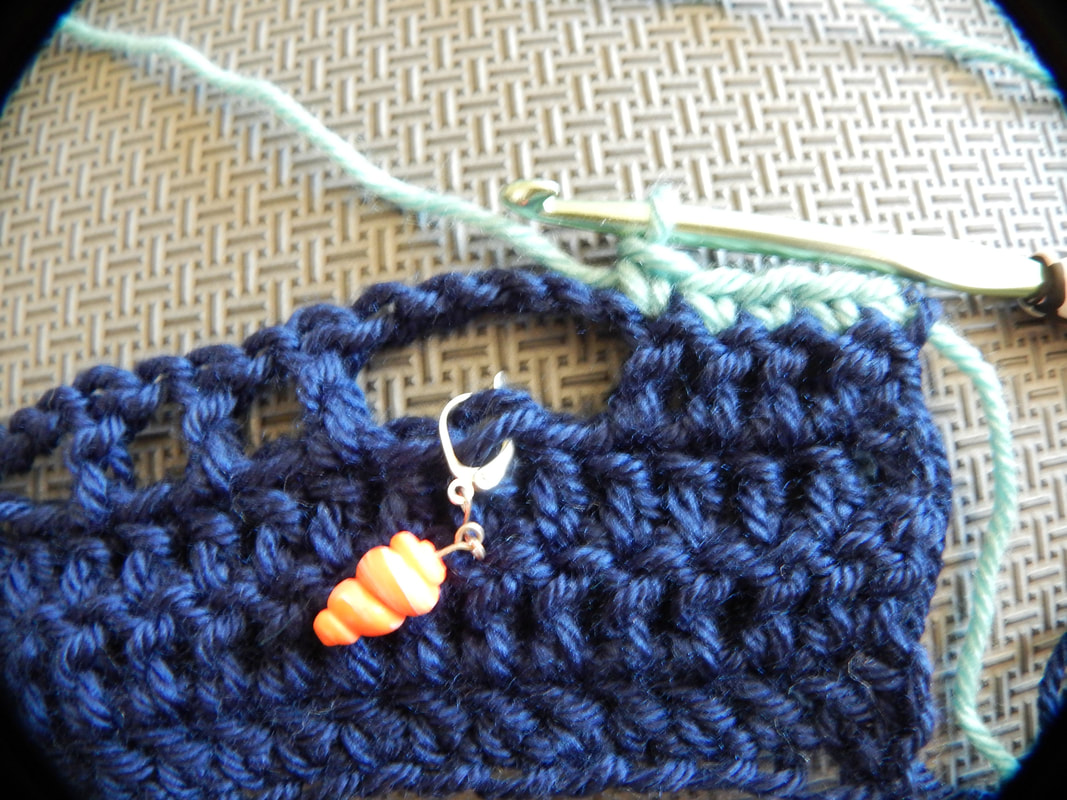
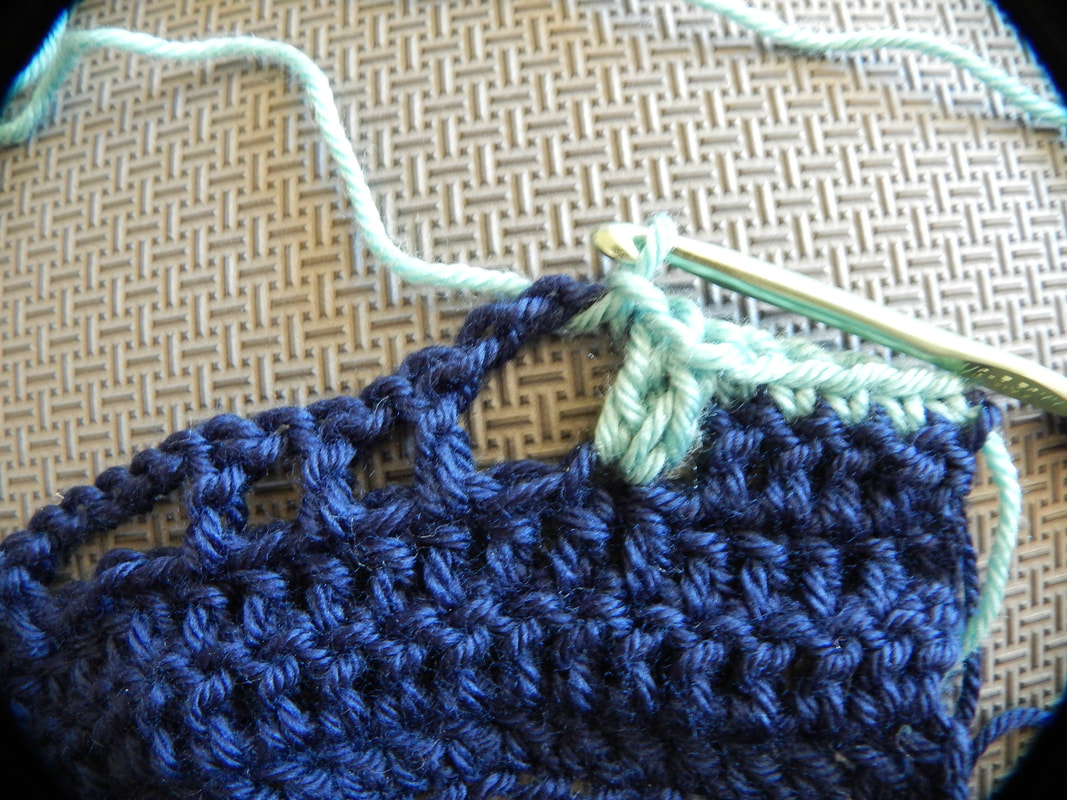
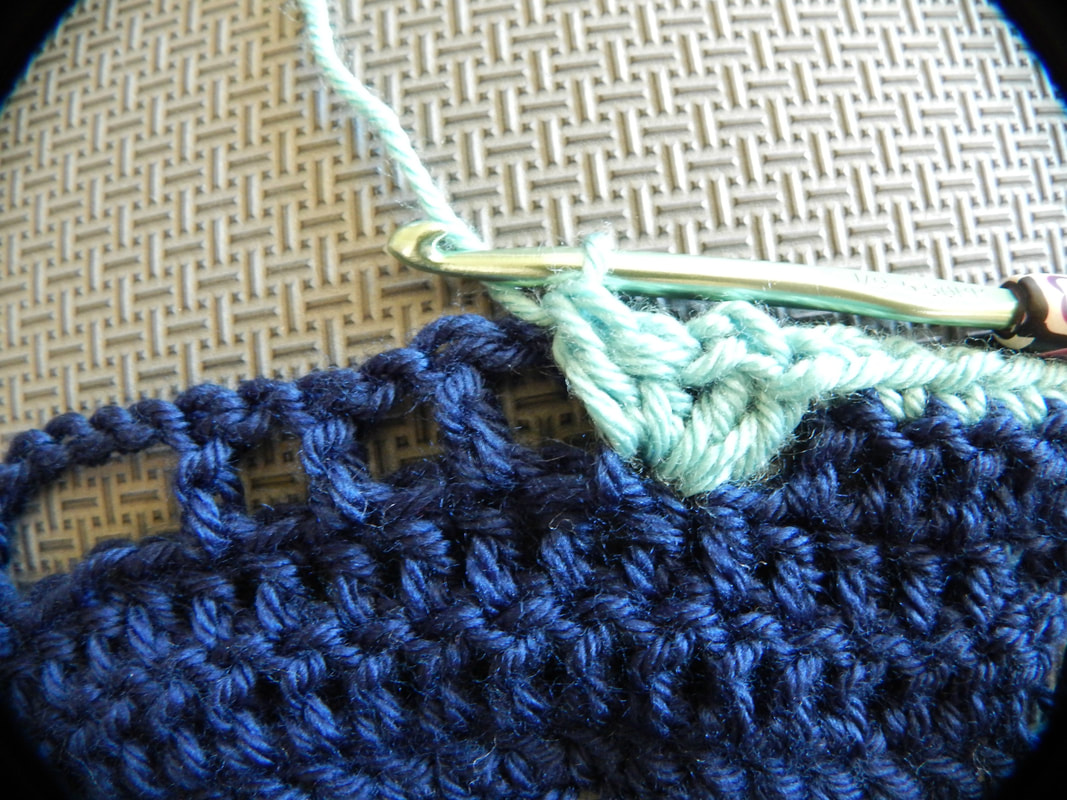
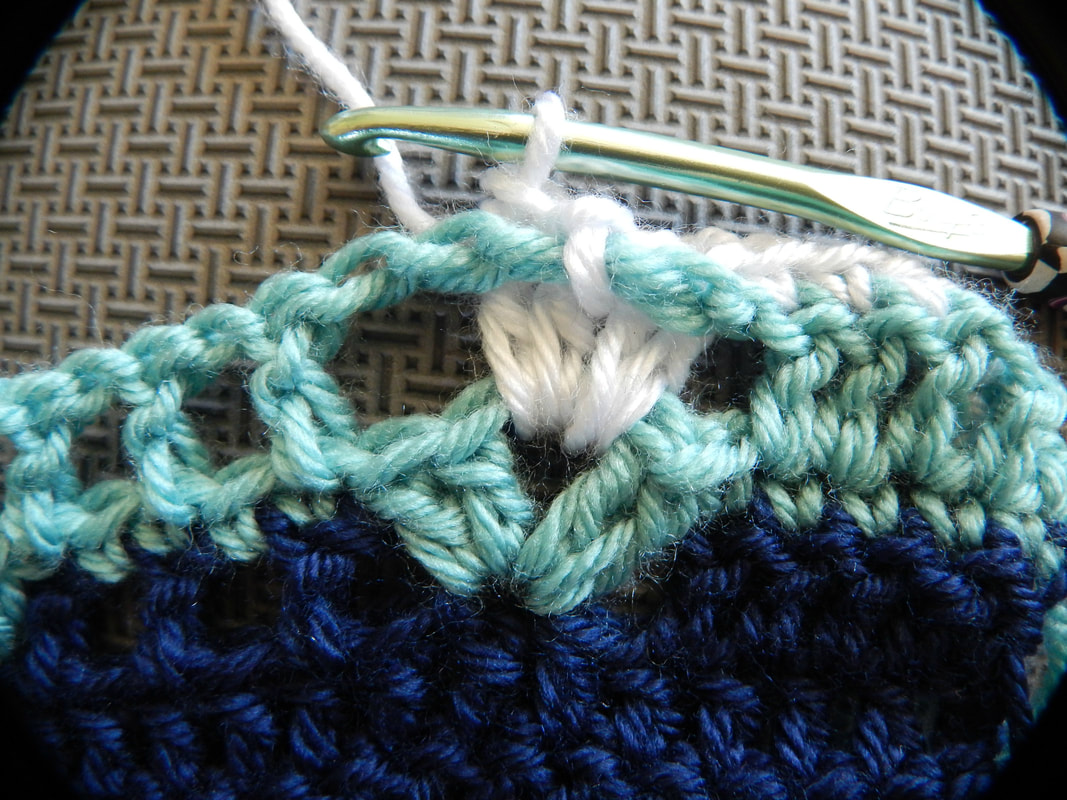
Row 43: With right side facing, attach yarn to stitch just left of stitch marker with a slip stitch Dc in same st, dc in next st, ch 5, skip next 3 sts, *dc in next st, (ch 1, skip next st, dc in next st)2x, ch 5, skip next 3 sts* repeat from *to* 4x, dc in next 2 sts With Sage Row 44: Turn, sc in first 2 sts, *working in front of next ch-5 skip next st 2 rows below, 2 dc in next st 2 rows below, sl st around ch-5 of previous row, 2 dc in same st (2 rows below working in front of same ch-5) (see P1-P3) as 2 dc just worked, sc in next 5 sts of previous row (see P4), * repeat from *to* 4x, working in front of next ch-5 skip next st 2 rows below, 2 dc in next st 2 rows below, sl st around ch-5 of previous row, 2 dc in same st (2 rows below working in front of same ch-5) as 2 dc just worked, sc in end 2 sts Row 45: Turn, dc in first 2 sts, ch 5, skip next shell section, *dc in next sc, (ch 1, skip next sc, dc in next sc)2x, ch 5, skip next shell section,* repeat from *to* 4x, dc in end 2 sts
With Snow
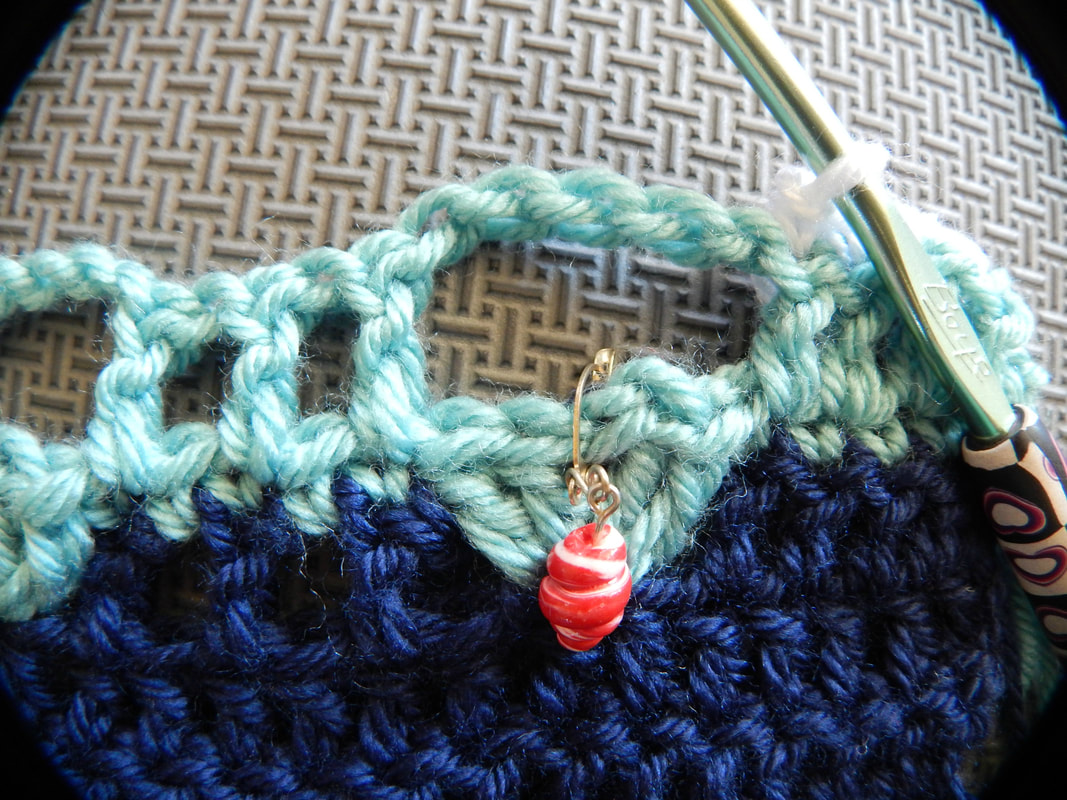
Row 46: Turn, sc in first 2 sts, *working behind next ch-5 work 2 dc around sl st (and ch-5) of shell 2 rows below, sl st around ch-5 of previous row, 2 dc around same st (2 rows below working behind same ch-5) as 2 dc just worked (see P5-P6), sc in next 5 sts of previous row,* repeat from *to* 4x, working behind next ch-5 work 2 dc around sl st (and ch-5) of shell 2 rows below, sl st around ch-5 of previous row, 2 dc around same st (2 rows below working behind same ch-5) as 2 dc just worked, sc in end 2 sts Row 47: Turn, dc in first 2 sts, ch 5, skip next shell section, *dc in next sc, (ch 1, skip next sc, dc in next sc)2x, ch 5, skip next shell section,* repeat from *to* 4x, dc in end 2 sts Rows 48-59: Repeat rows 44-47
With Sage
Rows 60-61: Repeat rows 44-45 Fasten off Sage and weave in ends With Snow Row 62: Repeat row 46 Fasten off Snow and weave in ends With Admiral Row 63: With right side facing, insert hook in stitch with stitch marker, remove stitch marker, ch 1, working up side of flap, work 2 sc around each end dc and 1 sc around each end sc to top corner, work 3 sc in top corner st, rotate to work across top of flap, sc in next 25 sts (do not work in the slip stitches), ch 3, skip next st, sc in next 25 sts, 3 sc in corner st, rotate to work down side of flap, work 2 sc around each end dc and 1 sc around each end sc to bottom of flap, sl st to same st as end dc in row 43 Round 64: Do not turn, ch 1, reverse sc in each stitch around flap and across top of pillow cover, sl st to beginning ch-1 to connect Fasten off and weave in ends
With yarn needle and Admiral yarn, stitch bottom foundation of pillow cover together, fasten off and weave in ends
Fold flap over pillow and use stitch marker to mark where the ch-3 is on the pillow section for the button With a needle and matching thread, stitch button where marked and remove stitch marker
You may also like...
0 Comments
Your comment will be posted after it is approved.
Leave a Reply. |

Kate WagstaffHey there! Thank you for joining my blog here at Crafting Friends Designs. Grab your hook, some yarn and get comfy as we crochet some fun, unique and beautiful projects together.  Archives
May 2024
 |


 RSS Feed
Proudly powered by Weebly