|
(c) 2012 Copyright by Kate Wagstaff of Crafting Friends Designs
(c) 2014 Photo Copyright by Ash & Co It is ILLEGAL to copy, share or upload this pattern to sites for others to access. This pattern is not to be used for educational purposes You do have permission to sell finished items you crochet using my patterns You are in no way to alter the pattern and claim it as your own to sell or give to others Please be sure to read through all the instructions carefully If you need customer support as you work a pattern, please email [email protected]
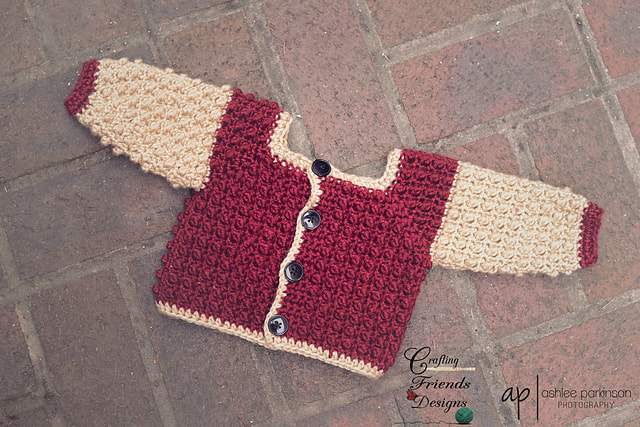
Don't you just love to snuggle with babies? I know I do! Back in 2012, I designed the Bubble Baby Sweater with comfort and warmth in mind. I loved the texture of the stitch used and style of it when using a different color for the sleeves. It reminds me of Leathermen jackets from High School and I think it would be a fun option to do in local school colors for baby photo props. It's a quick and easy project to work up whether it's for your own sweet little one or an opportunity to serve others.
I hope you'll enjoy this crochet pattern as much as I do. Be sure to add it to your favorites on Ravelry by giving it a "Heart"! This pattern is also available in an ad free pdf in the following places for a small fee Bubble Baby Sweater Crochet Pattern
**This post contains affiliate links**
Skill Level: Easy Materials: ~350-400 yrds 4ww yarn such as Caron Simply Soft, Red Heart Soft or Deborah Norville Everyday yarn. Other yarns may be substituted though your end size results may vary. ~Size G and Size J crochet hooks ~4 (7/8") Buttons ~needle and matching thread Finished Size: 0-6 months (19.5" chest) Remember - this is a sweater so it's meant to fit well over other clothing Gauge: With J hook 14 sc & 14 rows = 4" Stitches/Abbreviations: st(s) - stitches, sl st - slip stitch, ch - chain, yo - yarn over, sc - single crochet, hdc - half double crochet, tr - treble crochet Special Stitches: Hdc Foundation Chain: If you're unfamiliar with how to work foundation chains, this photo tutorial here on my blog may help http://craftingfriendsdesigns.blogspot.com/2014/12/hdc-chainless-foundation.html Loop: (sc, ch 2, sc) in same stitch Single Crochet 2 Together (sc2tog): [Insert hook into next st and draw up a loop]2x, yarn over and draw through all 3 loops on hook Half Double Crochet 2 Together (hdc2tog): [Yarn over and insert hook into next st and draw up a loop]2x, yarn over and draw through all 5 loops on hook Notes:
Row 1: Hdc Foundation Chain of 52 (if you prefer a basic chain, chain 54, turn, hdc in 2nd ch from hook and each ch across for a total of 52 hdc)
Row 2: Ch 1, turn, sc in next 8 sts, Loop in next st, sc in next 10 sts, Loop in the next st, sc in the next 12 sts, Loop in the next st, sc in the next 10 sts, Loop in the next st, sc in end 7 sts and in chain space Row 3: (Right side) Make sure to push your tr’s toward you as you work the next st so the bumps are all on this side) Ch 1, turn, sc in next 3 sts, (tr in next st, sc in next st)3x, Loop in next ch-2 space, (tr in next st, sc in next st)6x, Loop in next ch-2 space, (tr in next st, sc in next st)7x, Loop in next ch-2 space, (tr in next st, sc in next st)6x, Loop in next ch-2 space, (tr in next st, sc in next st)3x, sc in end 3 sts Row 4: Ch 1, turn, sc in next 10 sts, Loop in next ch-2 space, sc in next 14 sts, Loop in next ch-2 space, sc in next 16 sts, Loop in next ch-2 space, sc in next 14 sts, Loop in next ch-2 space, sc in end 10 sts Row 5: Ch 1, turn, sc in next 3 sts, (tr in next st, sc in next st)4x Loop in next ch-2 space, (tr in next st, sc in next st)8x, Loop in next ch-2 space, (tr in next st, sc in next st)9x, Loop in next ch-2 space, (tr in next st, sc in next st)8x, Loop in next ch-2 space, (tr in next st, sc in next st)4x, sc in end 3 sts Row 6: Ch 1, turn, sc in next 12 sts, Loop in next ch-2 space, sc in next 18 sts, Loop in next ch-2 space, sc in next 20 sts, Loop in next ch-2 space, sc in next 18 sts, Loop in next ch-2 space, sc in end 12 sts Row 7: Ch 1, turn, sc in next 3 sts, (tr in next st, sc in next st)5x, Loop in next ch-2 space, (tr in next st, sc in next st)10x, Loop in next ch-2 space, (tr in next st, sc in next st)11x, Loop in next ch-2 space, (tr in next st, sc in next st)10x, Loop in next ch-2 space, (tr in next st, sc in next st)5x, sc in end 3 sts Row 8: Ch 1, turn, sc in next 14 sts, Loop in next ch-2 space, sc in next 22 sts, Loop in next ch-2 space, sc in next 24 sts, Loop in next ch-2 space, sc in next 22 sts, Loop in next ch-2 space, sc in end 14 sts Row 9: Ch 3, turn, skip first st (this will create a button hole), sc in next 2 sts, (tr in next st, sc in next st)6x, Loop in next ch-2 space, (tr in next st, sc in next st)12x, Loop in next ch-2 space, (tr in next st, sc in next st)13x, Loop in next ch-2 space, (tr in next st, sc in next st)12x, Loop in next ch-2 space, (tr in next st, sc in next st)6x, sc in end 3 sts
Row 10: This row creates the armholes
Ch 1, turn, sc in next 16 sts, sc in next ch-2 space, ch 2, skip next 26 sts, sc in next ch-2 space (1st armhole created), sc in next 28 sts, sc in next ch-2 space, ch 2, skip next 26 sts, sc in next ch-2 space (2nd armhole created), sc in end 15 sts and in ch-3 Row 11: Ch 1, turn, sc in next 3 sts, (tr in next st, sc in next st)7x, tr in next chain space, sc in next chain space, (tr in next st, sc in next st)15x, tr in next chain space, sc in next chain space, (tr in next st, sc in next st)7x, sc in end 3 sts Row 12: Ch 1, turn, sc in each st across (68 sc) Row 13: Ch 1, turn, sc in next 3 sts, (tr in next st, sc in next st)31x, sc in end 3 sts Rows 14-15: Repeat rows 12-13 Row 16: Repeat row 12 Row 17: Ch 3, turn, skip first st, sc in next 2 sts, (tr in next st, sc in next st) 31x, sc in end 3 sts Row 18: Ch 1, turn, sc in each st across and in ch-3 (68 sc) Row 19: Repeat row 13 Rows 20-23: Repeat rows 12-13 Row 24: Repeat row 12 Rows 25-26: Repeat Rows 17-18 Row 27: Ch 1, turn, hdc in each st across (68 hdc) Fasten off and weave in ends Continue on to Vest Edging without sleeves OR Jacket Edging with sleeves
Vest Edging (no sleeves): With G hook and right side facing you,attach yarn to any stitch around the arm hole with a sl st, hdc evenly around armhole, sl st to beginning st to connect
fasten off and weave in ends Repeat process on other arm hole Jacket Edging (with sleeves): With G hook and right side facing you, attach yarn to bottom left corner of jacket and sc around entire jacket edge Fasten off, weave in ends and continue on to sleeve section Sleeves: (work the same for both right and left sides) With J Hook, connect yarn under the arm with the right side facing you Round 1: Sc in each st around to get 30 sts, sl st to beginning sc to connect Round 2: Ch 1, do not turn, *sc in next st, tr in next st* repeat from *to* around, sl st to beginning ch-1 to connect NOTE: Be sure to push your tr’s in this row towards you as this is the right side of the sweater sleeve Round 3: Ch 1, turn, sc in each st around, sl st to beginning ch-1 to connect Round 4: Ch 1, turn, sc in same space as ch-1, tr in next st, *sc in next st, tr in next st* repeat from *to* around, sl st to beginning ch-1 to connect Round 5: Ch 1, turn, sc2tog over next 2 sts, sc in each st around until 2 sts remain, sc2tog over next 2 sts, sl st to beginning ch-1 to connect Rounds 6-17: Repeat rounds 2-5 **You will need to turn when repeating row 2** Round 18: Ch 1, turn, *sc in next st, tr in next st* repeat from *to* around, sl st to beginning ch-1 to connect Round 19: Ch 1, do not turn, sc in each st around, sl st to beginning ch-1 to connect Round 20: Ch 1, do not turn, sc2tog over next 2 sts, sc in each st around until 2 sts remain, sc2tog over next 2 sts, sl st to beginning ch-1 to connect Round 21: Ch 1, do not turn, hdc2tog over next 2 sts, hdc in each st around until 2 sts remain, hdc2tog, sl st to beginning ch-1 to connect Fasten off and weave in ends Buttons: Place jacket on a flat surface overlapping the front edges (Right side 3 sc section over Left side 3 sc section), mark the position of the buttonholes and sew buttons to jacket
0 Comments
Your comment will be posted after it is approved.
Leave a Reply. |
Kate WagstaffHey there! Thank you for joining my blog here at Crafting Friends Designs. Grab your hook, some yarn and get comfy as we crochet some fun, unique and beautiful projects together. Archives
May 2024
|
Proudly powered by Weebly


 RSS Feed


