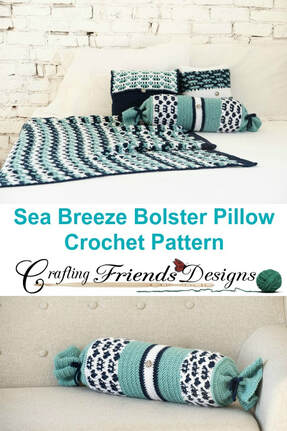
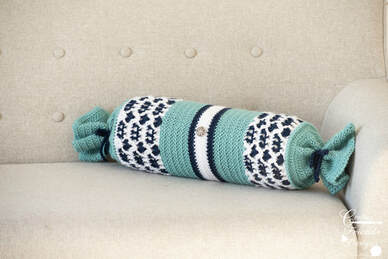
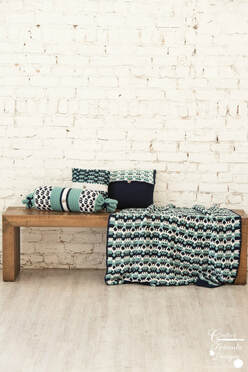
Introducing the new Sea Breeze Bolster Pillow Cover crochet pattern. This is a beautiful and quick project for gifts or to add to your own home decor. The candy wrapper style ends make it easy to swap out for other styles and colors and easy to remove for washing.
This pattern is available to view for FREE here on my blog by continuing below OR you can purchase an ad free pdf for a small fee HERE. The add free pdf includes instructions for a bolster pillow form if you prefer to make your own.  Crochet Pattern, Sea Breeze 6"x16" Bolster Pillow Form and Pillow Cover
***This post contains Affiliate links through which I may receive a small commission for purchases at no extra cost to you***
Sea Breeze Bolster Pillow Cover instructions
© 2018 Copyright by Kate Wagstaff of Crafting Friends Designs
© 2018 Photo Copyright Ash & Co It is Illegal to copy, share or upload this pattern to sites for others to access This pattern is not to be used for educational purposes You do have permission to sell finished items you crochet using my patterns You are in no way to alter the pattern and claim it as your own to sell or give to others Facebook: https://www.facebook.com/CraftingFriendsDesigns Etsy: www.etsy.com/shop/CraftingFriendsDesig Ravelry: http://www.ravelry.com/designers/kate-wagstaff
Skill Level: Easy
Terms: US crochet terminology Materials: Bernat Satin 4ww yarn or similar Snow - 94 yards Sage - 326 yards Admiral - 82 yards Yarn Needle Hook Size: I/9-5.50mm Gauge: 13 dc & 7 rows = 4 inches Finished Size: 30” wide x 17” diameter (fits a 6” x 16” bolster) Stitches/Abbreviations: ch - chain, st(s) - stitch(es), sl st - slip stitch, sc - single crochet, dc - double crochet RS - right side, WS - wrong side Special Stitches: Shell - (2 dc, sl st around ch-5, 2 dc) in indicated stitch Single Crochet 2 stitches together (Sc2tog): insert hook in indicated stitch, yo, pull up a loop, insert hook in next indicated st, yo, pull up a loop, yo, pull through all 3 loops on hook Herringbone hdc - yarn over, insert hook in indicated st, yarn over, pull through stitch and first loop on hook, yarn over, pull through remaining 2 loops on hook Foundation hdc - If you are unfamiliar with this foundation chain, view this photo tutorial on my blog http://craftingfriendsdesigns.blogspot.com/2014/12/hdc-chainless-foundation.html Reverse Single Crochet: working from left to right, insert hook from front to back in next st to the right, yarn over, pull up a loop, yarn over, pull through both loops on hook Back Post Single Crochet (BPsc): Insert hook from back to front to back around post of indicated stitch, yarn over, pull up a loop, yarn over and pull through all loops on hook
Notes:
With Sage
Round 1: (RS) Foundation hdc of 63, make sure your foundation chain is not twisted, sl st to beginning hdc to connect Note: Rounds 2-19, do not use standing stitches to begin these rounds. Instead, lengthen the loop on your hook to the height of a hdc and work a Herringbone hdc in the very first st Rounds 2-19: Turn, Herringbone hdc in each st around, sl st to beginning Herringbone hdc to connect (63 Herringbone hdc) Round 20: Do not turn, ch 1, skip first st to the right, reverse sc in each st around, sl st to beginning st to connect
With Snow
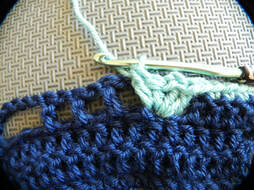
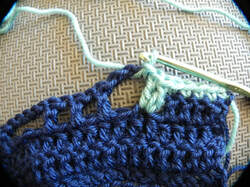
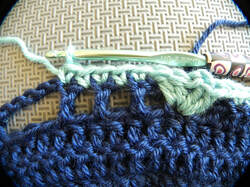
Round 21: (RS) Do not turn, BPsc around each stitch of round 19, sl st to beginning BPsc to connect (63 BPsc) Round 22: (WS) Turn, dc in next 2 sts, ch 5, skip next 3 sts, *dc in next st, (ch 1, skip next st, dc in next st)2x, ch 5, skip next 3 sts* repeat from *to* 6x, dc in end 2 sts, sl st to beginning dc to connect With Admiral Round 23: (RS) Turn, sc in next 2 sts, *working behind next ch-5 skip next st 2 rounds below, 2 dc in next st 2 rounds below, sl st around ch-5 of previous round, 2 dc in same st (2 rounds below working behind same ch-5) (see P1-P3) as 2 dc just worked, sc in next 5 sts of previous round (see P4),* repeat from *to* 6x, working behind next ch-5 skip next st 2 rounds below, 2 dc in next st 2 rounds below, sl st around ch-5 of previous round, 2 dc in same st (2 rounds below working behind same ch-5) as 2 dc just worked, sc in end 2 sts, sl st to beginning sc to connect Round 24: (WS) Turn, dc in next 2 sts, ch 5, skip next shell section, *dc in next sc, (ch 1, skip next sc, dc in next sc)2x, ch 5, skip next shell section,* repeat from *to* 6x, dc in end 2 sts, sl st to beginning dc to connect
With Snow
Round 25: (RS) Turn, sc in next 2 sts, *working in front of next ch-5 work 2 dc around sl st (and ch-5) of shell 2 rounds below, sl st around ch-5 of previous round, 2 dc around same st (2 rounds below working in front of same ch-5) as 2 dc just worked (see P5-P6), sc in next 5 sts of previous round,* repeat from *to* 6x, working in front of next ch-5 work 2 dc around sl st (and ch-5) of shell 2 rounds below, sl st around ch-5 of previous round, 2 dc around same st (2 rounds below working in front same ch-5) as 2 dc just worked, sc in end 2 sts, sl st to beginning sc to connect Round 26: (WS) Turn, dc in next 2 sts, ch 5, skip next shell section, *dc in next sc, (ch 1, skip next sc, dc in next sc)2x, ch 5, skip next shell section,* repeat from *to* 6x, dc in end 2 sts, sl st to beginning dc to connect Rounds 27-30: Repeat rounds 23-26
With Admiral
Rounds 31-32: Repeat rounds 23-24 With Snow Round 33: Repeat round 25 With Sage Round 34: Turn, sc in next 2 sts, *work 3 dc around sl st (and ch-5) of shell in previous round, sc in next 5 sts,* repeat from *to* 6x, work 3 dc around sl st (and ch-5) of shell in previous round, sc in end 2 sts, sl st to beginning sc to connect Rounds 35-43: Turn, Herringbone hdc in each st around, sl st to beginning Herringbone hdc to connect (63 Herringbone hdc) Gauge Check: 13” from foundation round to end of round 43 With Admiral Rounds 44-45: Turn, Herringbone hdc in each st around, sl st to beginning Herringbone hdc to connect (63 Herringbone hdc)
With Snow
Rounds 46-49: Turn, Herringbone hdc in each st around, sl st to beginning Herringbone hdc to connect (63 Herringbone hdc) With Admiral Rounds 50-51: Turn, Herringbone hdc in each st around, sl st to beginning Herringbone hdc to connect (63 Herringbone hdc) With Sage Rounds 52-60: Turn, Herringbone hdc in each st around, sl st to beginning Herringbone hdc to connect (63 Herringbone hdc)
With White
Round 61: (RS) Turn, sc in each st around, sl st to beginning sc to connect (63 sc) Round 62: (WS) Turn, dc in next 2 sts, ch 5, skip next 3 sts, *dc in next st, (ch 1, skip next st, dc in next st)2x, ch 5, skip next 3 sts* repeat from *to* 6x, dc in end 2 sts, sl st to beginning dc to connect With Admiral Round 63: (RS) Turn, sc in next 2 sts, *working behind next ch-5 skip next st 2 rounds below, 2 dc in next st 2 rounds below, sl st around ch-5 of previous round, 2 dc in same st (2 rounds below working behind same ch-5) (see P1-P3) as 2 dc just worked, sc in next 5 sts of previous round (see P4),* repeat from *to* 6x, working behind next ch-5 skip next st 2 rounds below, 2 dc in next st 2 rounds below, sl st around ch-5 of previous round, 2 dc in same st (2 rounds below working behind same ch-5) as 2 dc just worked, sc in end 2 sts, sl st to beginning sc to connect Round 64: (WS) Turn, dc in next 2 sts, ch 5, skip next shell section, *dc in next sc, (ch 1, skip next sc, dc in next sc)2x, ch 5, skip next shell section,* repeat from *to* 6x, dc in end 2 sts, sl st to beginning dc to connect
With Snow
Round 65: (RS) Turn, sc in next 2 sts, *working in front of next ch-5 work 2 dc around sl st (and ch-5) of shell 2 rounds below, sl st around ch-5 of previous round, 2 dc around same st (2 rounds below working in front of same ch-5) as 2 dc just worked (see P5-P6), sc in next 5 sts of previous round,* repeat from *to* 6x, working in front of next ch-5 work 2 dc around sl st (and ch-5) of shell 2 rounds below, sl st around ch-5 of previous round, 2 dc around same st (2 rounds below working in front same ch-5) as 2 dc just worked, sc in end 2 sts, sl st to beginning sc to connect Round 66: (WS) Turn, dc in next 2 sts, ch 5, skip next shell section, *dc in next sc, (ch 1, skip next sc, dc in next sc)2x, ch 5, skip next shell section,* repeat from *to* 6x, dc in end 2 sts, sl st to beginning dc to connect Rounds 67-70 : Repeat rounds 63-66 With Admiral Rounds 71-72: Repeat rounds 63-64 Fasten off Admiral With Snow Round 73: Repeat round 65
Round 74: (WS) Turn, sc in next 2 sts, *work 3 dc around sl st (and ch-5) of shell in previous round, sc in next 5 sts,* repeat from *to* 6x, work 3 dc around sl st (and ch-5) of shell in previous round, sc in end 2 sts, sl st to beginning sc to connect
Fasten off Snow With Sage Round 75: (RS) ch 1, skip first st to the right, reverse sc in each st around, sl st to beginning st to connect Round 76: Do not turn, BPsc around each stitch of round 74, sl st to beginning BPsc to connect (63 BPsc) Rounds 77-95: Turn, Herringbone hdc in next 63 sts, sl st to beginning Herringbone hdc to connect (63 Herringbone hdc) Round 96: Turn, ch 1, skip first st to the right, reverse sc in each st around, sl st to beginning st to connect
Fasten off and weave in ends
With right side facing, attach Sage to any stitch on foundation round, ch 1, reverse sc in each st around, sl st to beginning stitch to connect, fasten off and weave in ends Ties (make 2) Ch 60, turn, sl st in 2nd ch from hook and each ch sp across, fasten off You may also like...Seafoam Tranquility Bolster Pillow Crochet Pattern
$5.00
This wonderfully textured pillow is quick to work up and adds such a beautiful style to any room. This pillow is the 3rd pillow in the Seafoam Tranquility collection. This pattern includes instructions for a 6”x16” bolster pillow AND the pillow cover. Skill Level: Intermediate Materials: 800 yrds if making both the pillow and the cover. 1-1.5 lbs of Poly Stuffing OR 6”x16” bolster pillow 1 or 2 (1”) button(s) optional This pattern has been tested by experienced crocheters for ease and accuracy. If you have any questions, please email craftingfriends4you@yahoo.com for customer service. (c) 2017 Copyright by Kate Wagstaff of Crafting Friends Designs (c) 2017 Photo Copyright by Ash & Co It is ILLEGAL to copy, share or upload this pattern to sites for others to access. This pattern is not for educational purposes. You are welcome to sell the finished items you crochet using this pattern. Crochet Pattern, Cabled Zig Zag Bolster Pillow
$5.00
The Cabled Zig Zag Bolster Pillow crochet pattern is a great way to add texture to your home decor. This is a great weekend project filled with a beautiful chevron style texture!
This crochet pattern includes instructions for a 6" x 16" pillow base if you prefer to make your own along with the candy wrapper style pillow cover and a closed end pillow cover. Crochet Pattern is written in American (US) Terms Skill Level: Intermediate Materials: Deborah Norville Everyday yarn or similar 4ww yarn 343 yrds for Pillow Base if needed 400-431 yrds for Pillow cover 6”x16” Bolster Pillow 1-1.5 lbs Polly Fill for Pillow Base if needed Finished Size: 6”x16” base; 6”x29” cover Hook: J/10-6.00mm (size K hook for the base section if needed) Gauge: 13 hdc & 8 Rows = 4” Stitches/Abbreviations: sc - single crochet, hdc - half double crochet, dc - double crochet Special Stitches: Reverse Single Crochet, BPsc, sc2tog, hdc2tog, FPtr, Base dc/FPtrTOG, dc/FPtrTOG, Video Tutorial available here: https://www.craftingfriendsdesigns.com/bloggingfun/learn-the-dcfptrtog-to-use-in-the-cabled-zig-zag-crochet-pattern-collection HDC Foundation Chain photo tutorial found here: http://craftingfriendsdesigns.blogspot.com/2014/12/hdc-chainless-foundation.html This crochet pattern has been tested by many experienced crocheters for ease and accuracy. (c) 2018 Copyright by Kate Wagstaff of Crafting Friends Designs (c) 2018 Photo Copyright by Ash & Co and individual testers It is ILLEGAL to copy, share or upload this pattern to sites for others to access This pattern is not to be used for educational purposes You are welcome to sell the finished items you crochet using this pattern Please email craftingfriends4you@yahoo.com for customer service Coordinating home decor crochet patterns: Cabled Zig Zag Rectangle PIllow Cabled Zig Zag Square Pillow Cabled Zig Zag Throw Crochet Pattern, Traveling Arrows Bolster Pillow
$5.00
Beautiful stripes of color wheels mixed with the amazing texture of the Arrow stitch give just the right balance to the Traveling Arrows Bolster Pillow crochet pattern! This crochet pattern is part of the Traveling Arrows Home Decor Crochet Pattern Collection Coordinating patterns: Traveling Arrows Rectangle Pillow Traveling Arrows Square Pillow Skill Level: Intermediate . Terms: US Crochet Terminology . Materials: Caron Simply Soft 4ww yarn or similar 86 yards Country Blue 86 yards Dark Country Blue 320 yards White Stitch markers . Finished Size: 28 ½” x 16” diameter . Hook: J/10-5.75mm & K/10 ½ - 6.5mm . Gauge: (J Hook) 14 hdc & 11 rows = 4” Stitches/Abbreviations: st(s) - stitch(es), sl st - slip stitch, ch - chain, yo - yarn over, sc - single crochet, hdc - half double crochet, dc - double crochet
Special Stitches: Hdc Foundation: If you’re unfamiliar with how to work foundation chains, this photo tutorial may help http://craftingfriendsdesigns.blogspot.com/2014/12/hdc-chainless-foundation.html **If you prefer basic chains, work the required chain amount +2, turn, hdc in 2nd chain from hook and each chain across**
4-dc Cluster: (uses 4 sts), *yo, insert hook in next st, yo and pull up a loop, yo and draw through 2 loops on hook,* repeat from *to* 3x, yo and draw through all 5 loops on hook, chain 1 to close off
7-dc Cluster: (uses next 7 sts), *yo, insert hook in next st, yo and pull up a loop, yo and draw through 2 loops on hook,* repeat from *to* 6x, yo and draw through all 8 loops on hook, chain 1 to close off
Front Post Treble Crochet (FPtr): yo twice, working in front of previous row, insert hook from front to back around post of indicated st, yo and pull up a loop (4 loops on hook), [yo, draw through 2 loops on hook]3x
Single Crochet 2 stitches together (Sc2tog): insert hook in indicated stitch, yo, pull up a loop, insert hook in next indicated st, yo, pull up a loop, yo, pull through all 3 loops on hook
Herringbone hdc: yo, insert hook in next st, yo, pull up a loop through stitch and first loop on hook, yo, pull through both loops on hook
Reverse sc: working from right to left, insert hook in next st, yo, pull up a loop, yarn over and pull through both loops on hook
Back Post sc (BPsc): Insert hook from back to front to back around post of indicated stitch, yarn over, pull up a loop, yarn over and pull through both loops on hook
Front Post sc (FPsc): Insert hook from front to back to front around post of indicated stitch, yarn over, pull up a loop, yarn over and pull through both loops on hook (c) 2018 Copyright by Kate Wagstaff of Crafting Friends Designs (c) 2018 Photo Copyright by Ash & Co It is ILLEGAL to copy, share or upload this pattern to sites for others to access. This crochet pattern is not to be used for educational purposes. You are welcome to sell the finished items you crochet using this pattern Please read all instructions carefully. If you need help, email craftingfriends4you@yahoo.com for customer service. Be sure to note the name of the pattern you're working on and where you purchased the pattern. Braided Cable Block Bolster PIllow Crochet Pattern
$5.00
Add a classic look to your home decor with this Braided Cable Block Bolster Pillow.
The Braided Cable Block collection is great to work up for wedding gifts! The classic elegance and texture of this pattern will add that extra special touch to any room. This pattern includes instructions for making your own 6”x16” bolster pillow base if you haven’t purchased one already along with the instructions for the beautiful pillow cover. This pattern also includes options for the candy wrapper style end on the cover or a closed end cover. There are photos showing stitch placement within the pattern along with links to 2 videos to help with the special stitches if needed. Skill Level: Intermediate Materials: 480 yrds for the cover 343 yrds for the base 1-1.5 lbs Polly Stuffing OR a 6”x16” bolster pillow All my patterns are tested by experienced crocheters for ease and accuracy. (c) 2017 Copyright by Kate Wagstaff of Crafting Friends Designs (c) 2017 Photo Copyright by Ash & Co It is Illegal to copy, share or upload this pattern to sites for others to access. This pattern is not to be used for educational purposes. You are welcome to sell the finished items you crochet using this pattern. Crochet Pattern Queen of Hearts Bolster Pillow and Pillow Cover
$5.00
Every room needs a pillow and the Queen of Hearts Bolster Pillow is a great addition to every room! This crochet pattern is gives a warm and welcoming effect to your home decor. With the ability to easily remove the cover, you can swap out pillow covers for any reason. Have fun crocheting the Queen of Hearts Bolster Pillow in the colors of every season or maybe a few different colors to place in different rooms throughout the year. No matter your decor style, you'll enjoy this design! Coordinating crochet patterns: Queen of Hearts Rectangle Pillow Queen of Hearts Home Decor Collection (includes pillow and throw pattern) Skill Level: Intermediate Terms: US crochet terminology Materials: Caron Simply Soft 4ww yarn or similar such as Red Heart Soft or Bernat Satin ~385 yards Taupe ~108-451 yards White (108 yards for cover only, 343 yards pillow base only) ~ Stitch markers ~ 6”x16” Bolster Pillow OR 1 - 1.5 pounds Poly Fill Stuffing Finished Size: 6” diameter x 21” wide (Fits a 6” x 16” Bolster) Hook: Sizes E, H & K Gauge: (H hook) 13 dc & 7 rows = 4” Stitches/Abbreviations: ch - chain, CL - cluster, FP - Front Post, st(s) - stitch(es), sl st - slip stitch, yo - yarn over, sc - single crochet, hdc - half double crochet, dc - double crochet, dtr - double treble crochet RS - right side, WS - wrong side Special Stitches: *Foundation Chain:* If you’re unfamiliar with how to work foundation chains, this photo tutorial may help http://craftingfriendsdesigns.blogspot.com/2014/12/hdc-chainless-foundation.html *Front Post Double Treble Cluster (FPdtrCL):* *Yo 3x, insert hook from front to back to front of indicated st, yo, pull up a loop, [yo and pull through 2 loops on hook]3x,* repeat from *to* 2 more times, yo and pull through all 4 loops on hook *2-dc Cluster (2-dc CL):* (uses one st), [yo, insert hook into st indicated, yo and pull up a loop, yo and draw through 2 loops on hook]2x, yo and pull through all 3 loops on hook **Double Crochet 2 together (dc2tog):** yo, insert hook in indicated st, yo, pull up a loop, yo, pull through 2 loops on hook, yo, insert hook in next st, pull up a loop, yo, pull through 2 loops on hook, yo, pull through all 3 loops on hook *Beginning Standing stitches:* These stitches are used to start each row in place of a turning chain If you are unfamiliar with working these stitches, you can find a video tutorial here: http://jessieathome.com/crochet-techniques-chainless-row-turns-sc-hdc-dc/ Note: If you prefer to use turning chains, chain the amount needed for the first stitch height and then work a regular sc, hdc or dc in the very first stitch as written. Do not use the chain as a stitch. *Standing sc:* At the end of the previous row, remove loop from hook, turn work, insert hook in loop, insert hook in very first st, yo and pull through, yo and pull through 2 loops on hook *Standing dc:* At the end of the previous row, remove loop from hook, turn work, insert hook in loop, lengthen loop to height of dc, holding loop on hook, wrap hook from front to back around loop, insert hook from front to back of very first st, yo and pull up a loop (3 loops on hook), yo and pull through 2 loops on hook, yo and pull through remaining 2 loops on hook (c) 2018 Copyright by Kate Wagstaff of Crafting Friends Designs (c) 2018 Photo Copyright by Ash & CO It is ILLEGAL to copy, share or upload this pattern to sites for others to access. This pattern is not to be used for educational purposes. You are welcome to sell the finished items you crochet using this pattern All Crafting Friends Designs crochet patterns are tested by a group of experienced crocheters for ease and accuracy. If you have any questions while working my patterns, please feel free to email craftingfriends4you@yahoo.com for customer service. Crochet Pattern, Pebbled Archway Reversible 6" x 16" Bolster Pillow Cover
$5.00
Enjoy the peak-a-boo color of the arches or a fun splash of color with the pebbles in this Pebbled Archway Reversible Bolster Pillow cover! This pattern fits a 6” x 16” diameter bolster pillow and is worked with open candy wrapper style ends for easy removal. Coordinating crochet patterns: Pebbled Archway Reversible Rectangle Pillow Pebbled Archway Reversible Square Pillow Pebbled Archway Reversible Throw Pebbled Archway Reversible Home Decor Collection (includes all 4 crochet patterns) Skill Level: Intermediate Materials: 445 (total yards) Red Heart With Love 4ww yarn or similar 195 yards White 250 yards Grey Yarn Needle 12”x6” Bolster Pillow Form Finished Size: 26” wide x 17” around Hook: H/8-5.00 mm Gauge: 14 sc & 17 rows = 4” Terminology: US crochet terms Stitches/Abbreviations: st(s) - stitch(es), sl st - slip stitch, ch - chain, yo - yarn over, sc - single crochet, hdc - half double crochet, dc - double crochet, tr - treble crochet, TTCL - Triple Treble Cluster, sc2tog (c) 2018 Copyright by Kate Wagstaff of Crafting Friends Designs (c) 2018 Photo Copyright by Ash & Co It is Illegal to copy, share or upload this pattern to sites for others to access. This pattern is not to be used for educational purposes. You are welcome to sell the finished items you crochet using this pattern. This pattern has been tested by experienced crocheters for ease and accuracy. Please email craftingfriends4you@yahoo.com for customer service. Be sure to include the name of the pattern, where you purchased the pattern and clearly explain what you need help with.
0 Comments
Your comment will be posted after it is approved.
Leave a Reply. |

Kate WagstaffHey there! Thank you for joining my blog here at Crafting Friends Designs. Grab your hook, some yarn and get comfy as we crochet some fun, unique and beautiful projects together.  Archives
March 2024
 |


 RSS Feed
Proudly powered by Weebly